| Permissions |
|
| Related readings |
The Knowledge table allows you to automatically extract data from your files at a large scale, thus leaving you more time to focus on higher value tasks.
Files formats for which knowledge can be extracted are listed in Accepted resources where parsing is possible.
TABLE OF CONTENTS
- Create a Knowledge table
- Configure your table
- Understand and manage results
- Personalize your table
- Export
- Collaborate
Create a Knowledge table
A Knowledge table can be created from a collection, hosted in the Library or in a project.
The table is linked to the collection, meaning that:
- if you update it from a project, it will also be updated in the Library
- its actions are governed by the collection's policy: users with READ access will only be able to see the table but not interact with it.
To access the table, go to your collection and click on the Knowledge button.

Configure your table
If your collection contains files, they will be visible in the first column of the table.
If you don't have files yet, you can upload or drag&drop them directly from your table.
Disclaimer: your files must be indexed for the data extraction to work.
You can then proceed and add new fields (columns) to extract the information needed.
To do this, click on the '+' next to the file column.

Add a single field
You can:
- extract
- enrich
- add a Manual field
- add Duplicate detection
Extract data
To extract information from your files, you need to:
- add a field name (header)
- add a guideline (optional): you can for example limit the answer with an amount of characters or impart the output you are expecting
- select a field type: text, number, binary (True/False), date, select (model has to select within a list)
You can also specify if the answer can be multiple. For example, if you are requesting for authors names, there may be several, so you need to allow multiple values answer.
You are not limited in the way you ask for information, it can be from a simple word to a question with thorough guidelines.
If you choose the 'select' output, an option is available to let the model propose options. This way, the model will prioritize your list, but propose options when they fit best. You can then accept or reject the model propositions.

Multi-dimensional extract
It is possible to create "a table within a table" through the multi-dimension extraction.
This option allows to define sub-sets and properties to extract within each row.
Beware, this extraction can take time and is costly.
Enrich
Enrich allows you to find information online to complete your data.
You need to:
- add a field name
- select the source: wikipedia, brave browser (web search), other collections
- add a guideline (optional): you can precise what you are looking for
- select a field type: text, number, binary (True/False), date, select
- allow multiple values if needed
- select the field(s) used as input: you might want to enrich a specific column of your table

Add a manual field
You can use manual field to add information that cannot be provided by the system, for example personal notes or a code used internally to classify documents.
To add a manual field, you need to:
- add a field name
- select a field type
- allow multiple values if needed
The field will be created and you will be able to fill in the cells as long as you respect the format selected.
Add a duplicate detection
You can use a "duplicate detection" field to analyze existing fields in the table:
- Name your field, for example "Duplicate"
- Select the field(s) you want to analyze; if several fields are selected they will be concatenated.
- Compute: the strings will be normalized and compared with a "soft match"
It will identify: Unique fields, Original (first occurence found), and Duplicate (n occurence found).
Add pre-configured fields
Use task preset
You can add task presets to gain some time building your table.
Columns will be added and automatically filled.
Please note task presets might be less detailed than what can be done on a table.


To create new presets, please refer to the article Manage presets.
Use table template
To save and reuse table configurations, you can use table templates.
A table template allows to save several fields from different field types, with their full configuration and dependancies.

It can then be used in any table.

Understand and manage results
Cells status
Cells can have different statuses:
- pending (waiting in queue) - orange timer icon: you won't be able to interact with the cell, you need to wait
- running (result is being computed) - blue loader: you won't be able to interact with the cell, you need to wait
- incomplete (something is missing, for example an input, and the result cannot be computed) - red dot: you need to edit the field configuration or your table to make sure every element is available, then recompute the field.
- error (something went wrong and prevented from getting an output) - red dot: you can check if your file is well indexed, try recomputing or contact the support
- output (result has been computed): you can double click and manually edit the result if needed
- stale (input or extract configuration has changed but not the result) - orange dot: you should recompute the cell or the field
- manually edited (it means someone edited the result) - blue dot
Explain results
Once a result is computed, four actions are available:
- Recompute: relaunch the computation of the cell (current result and status will be replaced)
- Expand: view the full result (long text might be truncated)
- Explain: get an overview of the file, including an answer, the explanation and an in-text justification

- Edit: edition is available by double clicking on the result.

Display Explain in new column
If needed, you can display the content of the Explain in a new field.
To do so, click on the field menu and then on "Display explanation as column".
A new field will then be created next to it with raw content of Explain.

Review file
Once you have created all the columns you want, you can easily check the results by opening the file and reviewing all computed answers.

If some answers do not match your expectations, you can edit them by double clicking on the result.
They will be marked as 'manually edited' with a timestamp.
You can recompute the cell if you want to go back to the previous unedited answer.
Personalize your table
Manage files
Upload a file
You can upload new files to your table, they will also be added to your collection.
Results will automatically be computed for each column once the file is indexed.
To upload new files, you can:
- click on the blue '+' button
- upload a file or folder from your computer
- select a file from your Library
- click on the '+' on the last row of your table and
- upload a file or folder from your computer
- select a file from your Library
- drag and drop a file directly onto the table
Remove a file
You can remove a file directly from the table.
To do so, click on the arrow next to the file and click on 'Delete'.
It will also be removed from your collection.
Manage fields
Fields actions are available by clicking on the arrow next to the field name.
Hide a field
You can hide fields to get a simpler view of your table while working on specific fields.
Hidden fields are then accessible from the menu, where you can unhide them.

Delete a field
You can delete a field. It will be removed from the table and the extracted data will be lost.
Duplicate a field
You can duplicate a field. A configuration box will appear with the configuration of the field. You can update it and/or validate to create the new column.
Edit a field
You can edit the configuration of a field. When validating, the column is automatically recomputed.
Recompute a field
You can recompute a field. This will relaunch the calculation for all the cells.
Resize a field
You can resize a field to adapt its width. To do so, go to the headers, to the immediate left of the separation between fields.
Your icon will change. You can then click and expand or narrow the field.

Pin field to the left
If you need a field to stay fixed and visible when scrolling through your table, you can pin it to the left of your table.

Reorder
You can reorder your columns by grabbing them and moving them where you want.

Apply conditional formatting
You can apply a conditional formatting on a field to display a specific color or icon when matching certain conditions.

Manage views
Sort your table
You can sort files by selecting available field(s) in your table and determining the order:
- text output: A to Z, or Z to A
- number output: ascending or descending
- boolean output: true first or false first
- date output: earliest first or latest first
- select output: first to last or last to first
- format: format order to define
Sorting priority is from first field to last field.
Filter your table
There are three different filters available on the table:
- value filter: you can include or exclude files on conditions
- text output: contains, does not contain, is, is not, is empty, is not empty, is unique, is not unique
- number output: =, =!, >, >=, <, <=, is empty, is not empty
- boolean output: is true, is false, is empty, is not empty
- date output: is, is not, is within, is before, is after, is on or before, is on or after, is empty, is not empty
- select output: is, is not, is any of, is non of, is empty, is not empty

- format filter: you can display files with the selected formats (as per created through conditional formatting)
- manual filter:
- select the files manually
- then, click on "create filter from selection"
- then, select if you want to hide or show selection (it will override other filters)
- finally, name and save the manual filter

Applied filters will allow to show or hide files that match the conditions.
Filter count is visible on the filter button.
Please note that when adding a new field to your table, only visible rows (i.e. non excluded) will be computed.
Save as view
All table visual configuration (filter, sort, hide, conditional format) can be saved and shared through Views:

- views are shared with the same permission level as the collection/table
- when modifying a view, you can update it or save as new view
- each user can define his default view for each table
- you can consult the details of each view
Create a sub-collection
If needed, a sub-collection can be created from a view.
This allows to create a chain of collections, quite useful for screening use cases.

- each collection can have maximum 1 sub-collection, it works as a chain (A>B>C>D)
- the sub-collection is created with the "visible" files from the parent collection (i.e. not excluded through filters). It is also possible to copy fields (this is only a copy, it is not dynamic)
- the chain is a whole, you cannot add/remove just one of its element
- if you delete a collection, it will break the chains (delete C results in A<B and D)
- you can "unlink" collections, it will break the parent link
If you update the view, you can "propagate the changes" to the child collection.
For now, this allows to update the list of files in the sub-collection.
It won't change the fields you have copied nor their content; if needed, recompute the fields manually.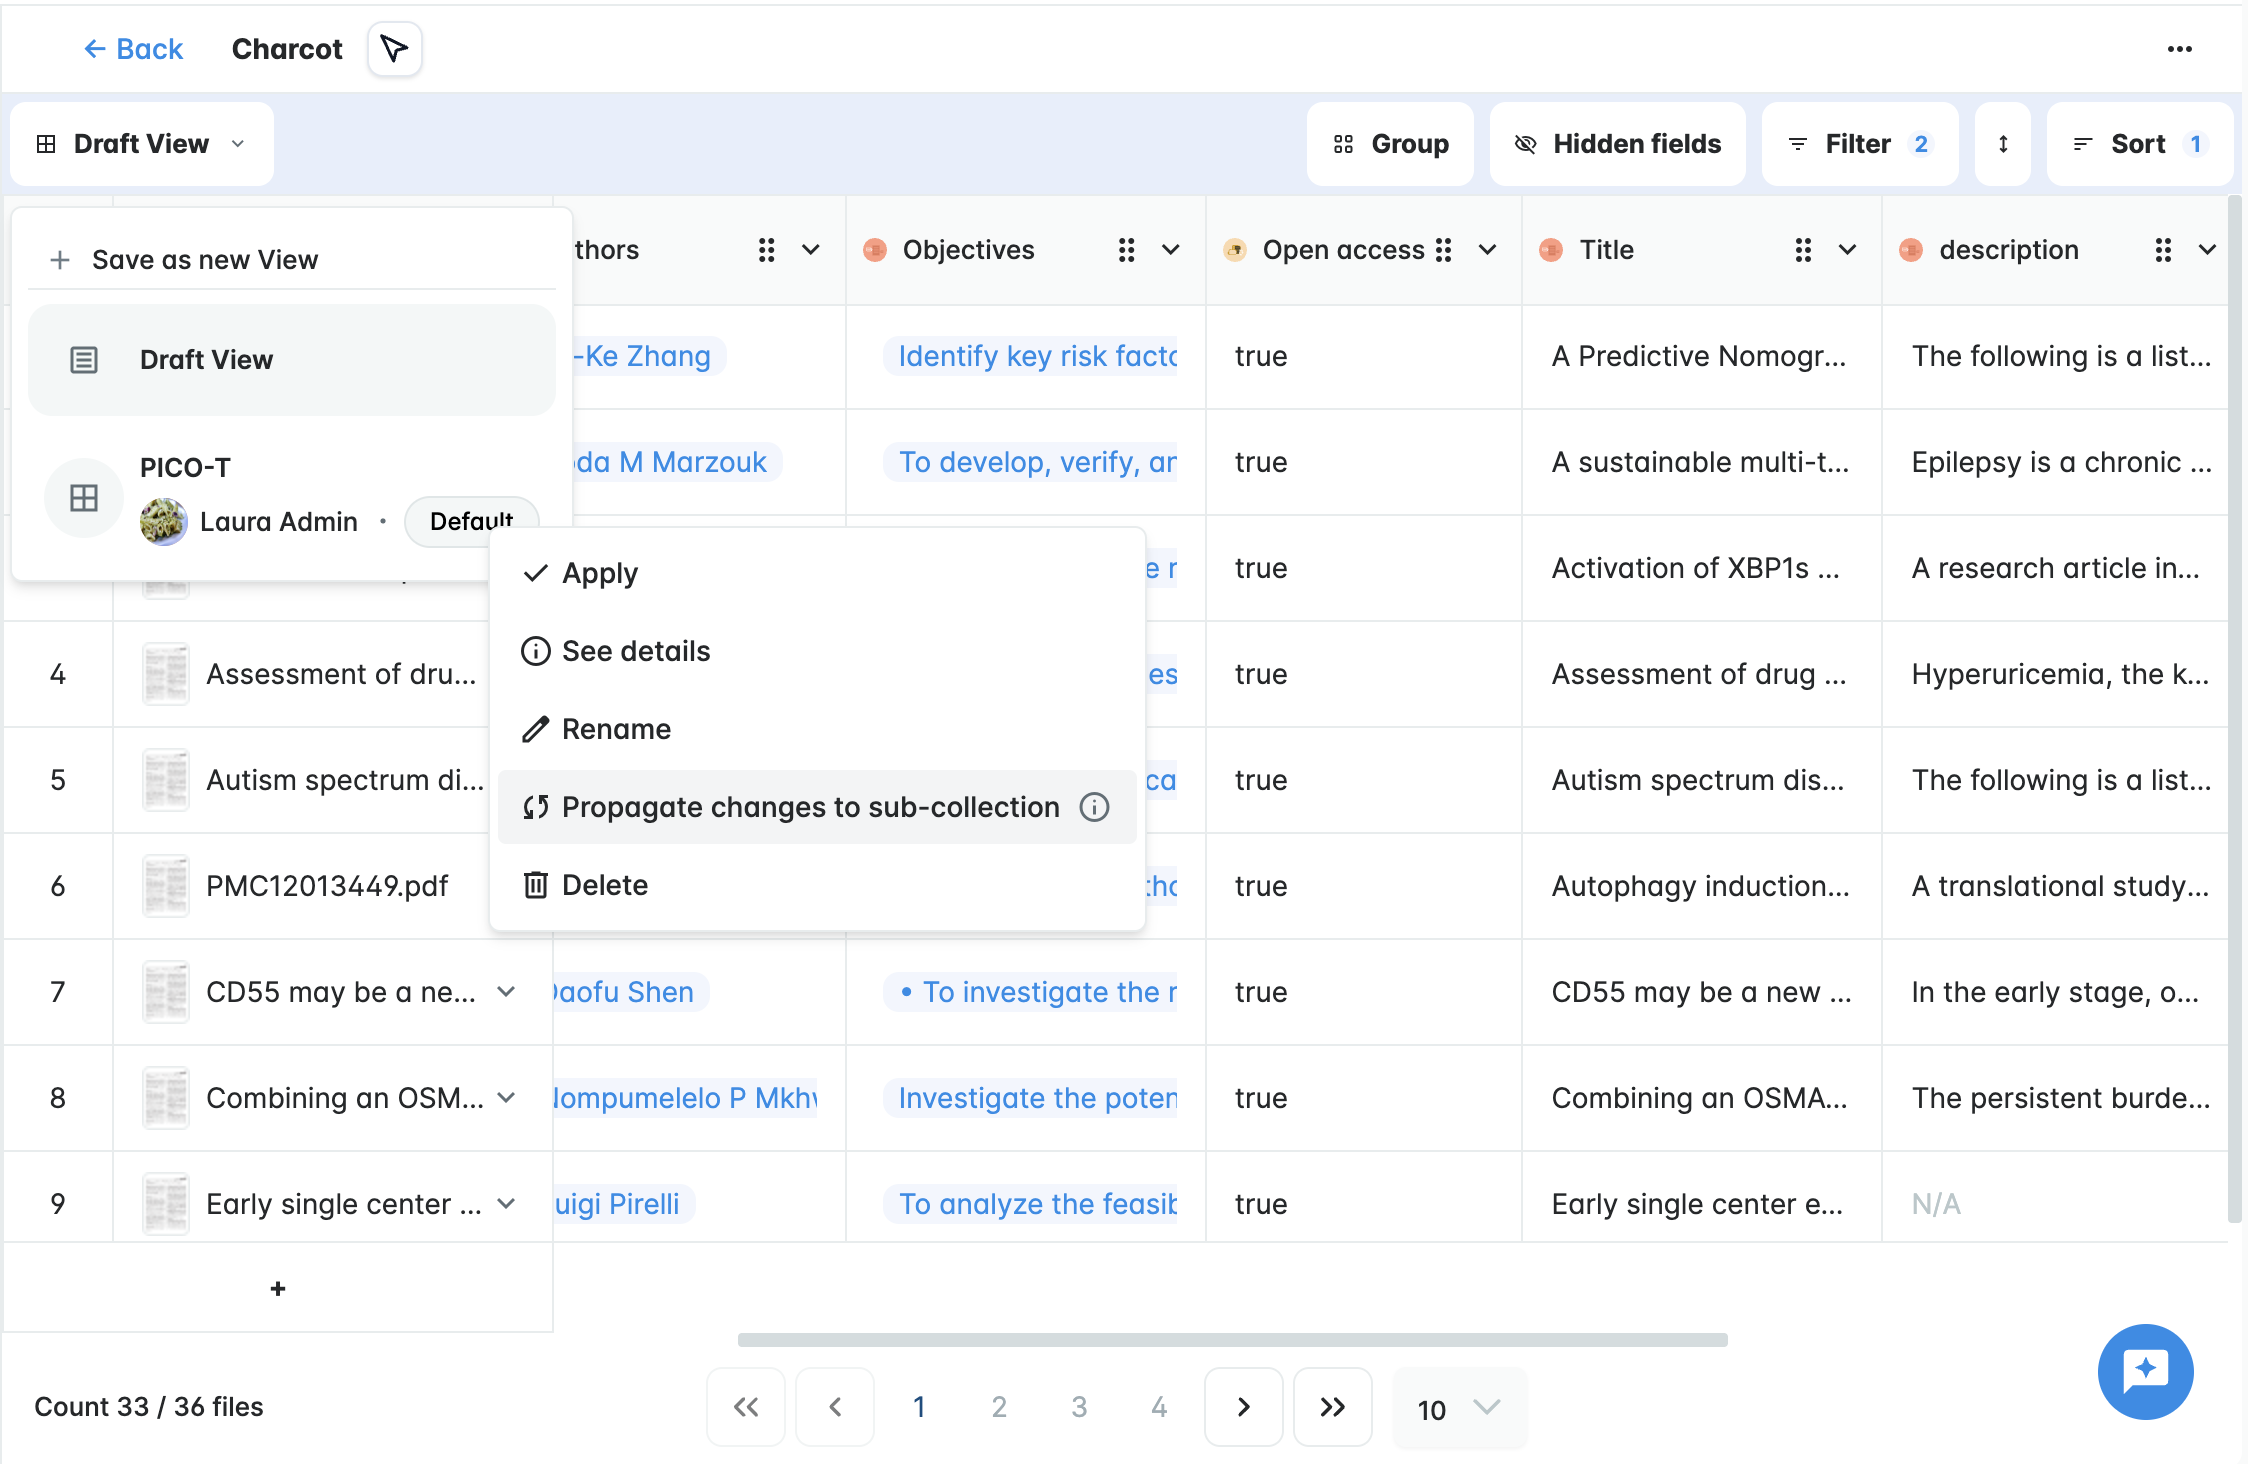
Export
You can export your Knowledge table in .csv or .xlsx format.
To do so,
Click Download in the top-right corner of the table.
Select the export format.
Choose whether to include guidelines.
When guidelines are included, they appear in a dedicated column for each item. If the cell was manually edited by a user, it will display the edition timestamp instead.

Collaborate
See who is working on the table
To facilitate the collaboration on the table, some protections have been added.
You can see who is currently working on the table by checking the user icons on the top-right corner of the screen.

Lock fields to prevent edition
Fields are locked to avoid edition by another collaborator while you are working on it.

Manually lock a field to prevent edition by another collaborator.
Only you or a sys admin can unlock it.
Check field activity
Consult field activity to see when it was created and last edited, and by whom.

Was this article helpful?
That’s Great!
Thank you for your feedback
Sorry! We couldn't be helpful
Thank you for your feedback
Feedback sent
We appreciate your effort and will try to fix the article